HubBox Integration for Shopify (Basic & Advanced Plans)
Introduction
Welcome Shopify merchants! This guide details how to integrate HubBox pickup point services into your store using the official HubBox Local Pickup Shopify App, specifically designed for stores on Shopify Basic, Shopify, and Advanced Shopify plans.
IMPORTANT: For plans beneath the Advanced tier, you will need to ensure that CCS (Carrier Calculated Shipping) is enabled as this is required for the HubBox integration. Enabling CCS may incur an additional charge, please speak to Shopify directly to check whether this functionality is enabled and for more information on charges.
View HubBox on Shopify App Store
Key Difference from Shopify Plus: Stores on Shopify Plus have access to Shopify's "Checkout Extensibility," allowing deeper checkout customization. This app for Basic/Advanced plans integrates differently, primarily by configuring new Shipping Rates for pickup services, rather than modifying the checkout UI directly. For Shopify Plus integration details, please see our Shopify Plus documentation.
Prerequisites:
- A Shopify store on a Basic, Shopify, or Advanced plan.
- Carrier Calculated Shipping (CCS) functionality enabled.
- Admin access to your Shopify store.
- An agreement or contact with the HubBox Sales/Integrations team to activate and license your account within the app.
How it Works (Basic/Advanced Plans)
Unlike Shopify Plus which allows extensive checkout UI changes, this app leverages Shopify's built-in Shipping Rates functionality:
Installation
- App Installation: You install the HubBox Local Pickup app from the App Store.
- Configuration: Within the app's admin panel, you configure which pickup networks (carriers) you want to offer and set up corresponding Shopify Shipping Rates for these services (e.g., "DPD Pickup Point - Next Day", DHL Parcel Pickup - Express", or "UPS Access Point - Standard").
Checkout Process
- A customer enters their shipping address at checkout.
- Shopify requests available shipping rates for that address based on your Shipping Zones.
- The HubBox app (using Shopify's Carrier Service API) identifies eligible HubBox pickup services for that address.
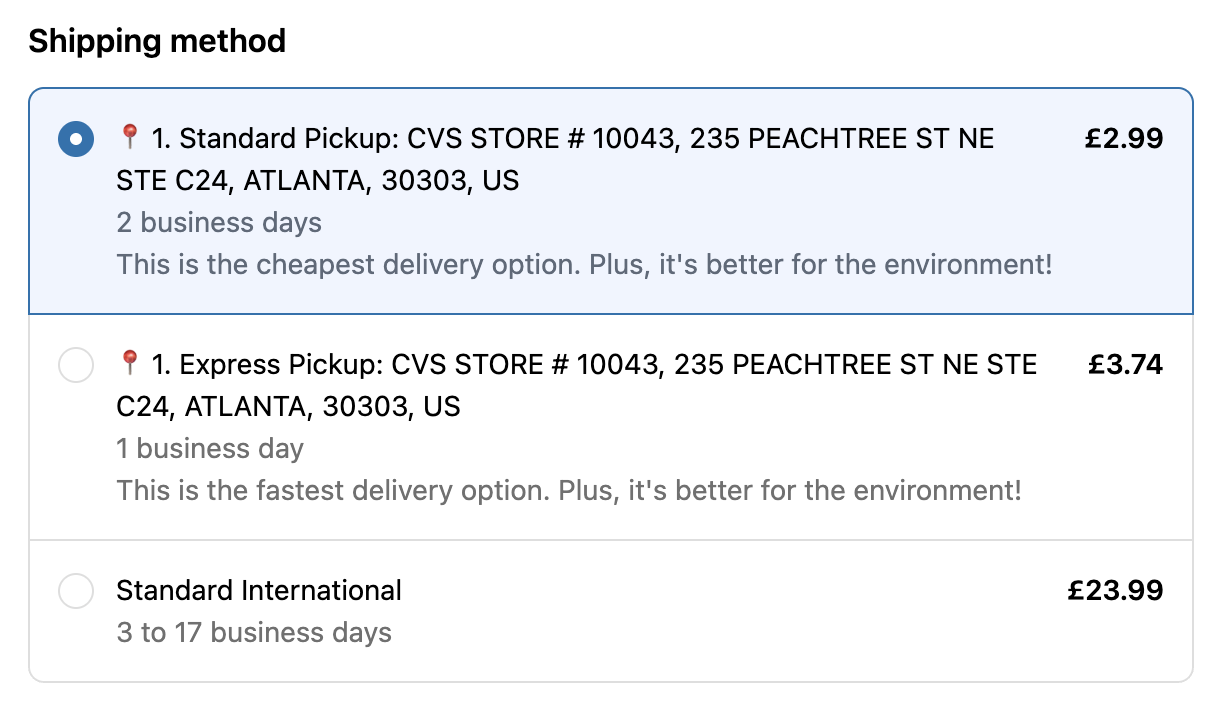
- The configured HubBox pickup rate(s) are returned and displayed alongside your existing home delivery rates in the standard Shopify shipping methods list. -The customer simply selects the desired pickup rate (e.g., "DPD Pickup Point", "UPS Access Point", "DHL Parcel Pickup") just like any other shipping option.
Order Processing
The order is placed. The HubBox app then automatically adds specific information (tags and note attributes) to the Shopify order to identify it as a pickup order and specify the chosen location. The shipping address is modified to match the customer's chosen pickup location address.
Installation & Initial Setup
Follow these steps to get the HubBox app installed and ready for configuration.
Step 1: Install the App
- Go to the HubBox Local Pickup page on the Shopify App Store.
- Click "Add app" or "Install".
- Follow the prompts within your Shopify admin to grant the necessary permissions and install the app.
IMPORTANT: You may see an option to set up a subscription. Please do not follow this process as HubBox will enable your access to the app without this.
Step 2: Account Licensing & Activation
- New HubBox Clients: If you haven't finalized terms with HubBox, please contact our Sales Team first. They will arrange your agreement and ensure your account is set up for licensing.
- Existing Agreements: If you've already agreed on terms, the HubBox Integrations team will typically reach out after you install the app. They will activate or "License" your account within the app's backend, enabling full access to the configuration settings.
You generally cannot fully configure or launch the app until your HubBox account is linked and licensed by the HubBox team. Please do not click on the subscription option.
Step 3: Configure Shopify API Access & EventBridge Integration
For the HubBox app to function correctly (specifically, to add identifying tags and pickup details to orders after they are placed), it requires secure access to your Shopify Admin API and a way to receive real-time event notifications via Amazon EventBridge. This is set up by creating a "Custom App" within your Shopify settings.
Create Custom App
- Go to Settings > Apps and sales channels
- Click Develop apps

- Click Create an app.
- App name: Enter
HubBox Integration(or similar). - App developer: Select your staff account.
- Click Create app.

Configure Admin API Scopes
- On the custom app's overview page, click the Configuration tab.
- In the Admin API integration section, click Configure.
- In the search box, find and select the following permissions:
read_orderswrite_orders
- Click Save.

Install App & Reveal Token
- Navigate to the API credentials tab for your custom app.
- Click the Install app button (top right).
- Confirm the installation by clicking Install in the pop-up.
- The Admin API access token section will now appear. Click Reveal token once.

Configure EventBridge
- Still on the Configuration tab, find the Event subscriptions section (ensure you have selected Webhook version 2024-04 or later (Latest recommended) at the top of this tab - click Edit if needed).
- Locate Amazon EventBridge and click Add source.
- Enter the HubBox AWS account details exactly as follows:
- AWS account ID:
202751687471 - AWS region: Select
Europe (Ireland) eu-west-1
- AWS account ID:
- Click Add source.
- Click Save at the top of the Configuration page.


Copy Token Securely
This token is shown only ONCE. Copy it immediately to a secure temporary location (like a password manager or a temporary secure note). Do not save it directly into the HubBox Admin Panel yet. If you navigate away or close the window before copying, you must uninstall and reinstall this custom app to generate a new token.
Save Token in HubBox App Admin
- Now, go back to the HubBox App Admin Panel in Shopify (Apps > HubBox Local Pickup).
- Navigate to the Settings / Additional Settings / API Credentials section (exact location may vary).
- Carefully paste the Admin API access token you copied into the designated field.
- Click Save within the HubBox App Admin Panel.

HubBox Validation
- When you save the token in the HubBox admin panel, our system automatically performs checks to:
- Validate the token has the correct
read/write_orderspermissions. - Verify the AWS EventBridge source is correctly configured and pointing to HubBox's account.
- Attempt to register required webhooks (like
orders/create,app/uninstalled).
- Validate the token has the correct
- The results of these checks will be displayed in the HubBox admin panel to confirm successful setup or highlight issues.
Configuring the HubBox App
Once the app is installed and your account is licensed by HubBox, you can configure the pickup options.
- In your Shopify Admin, navigate to Apps.
- Find and click on the HubBox Local Pickup app. This opens the HubBox App Admin Panel.
- Configure the following sections:
| Admin Panel Option | Set Up |
|---|---|
| Select Courier Service | Choose which carrier networks (e.g., UPS, DPD, DHL) you want to offer for pickup. |
| Change Region | Select the geographic regions/countries where these services should be available. |
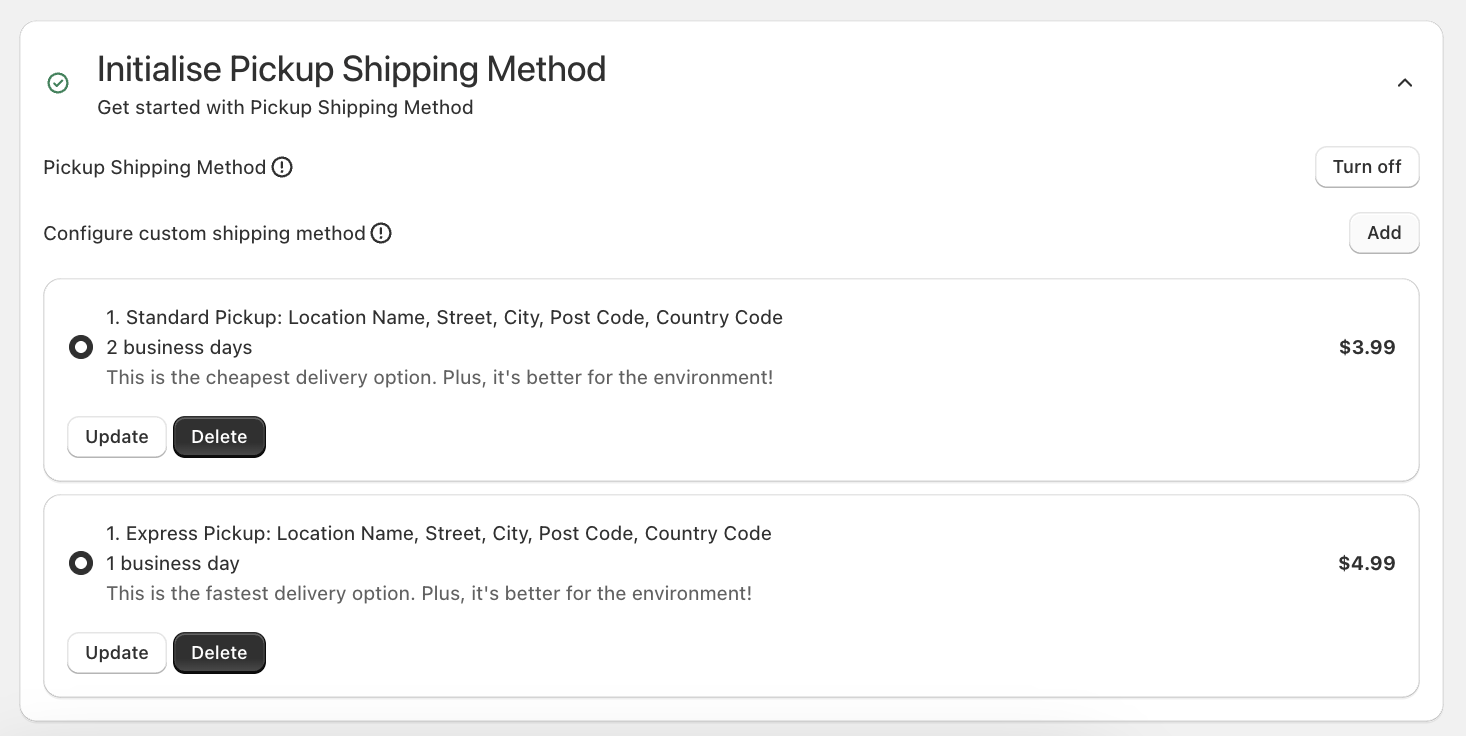
| Initialise Pickup Shipping Method | Turn On to enable the HubBox app to present pickup shipping methods |
| Configure custom shipping method | Click "Add" to configure custom shipping method and create new Pickup shipping rates |
| Additional Settings - Orders Token | Input for the orders token created via the custom app in Step 3 |
| Additional Settings - Payment methods filter | Install if required to hide pickup option for certain Payment Methods (e.g., Apple Pay, Shop Pay, Klarna, etc.) |

Handling Product Eligibility
Unlike Shopify Plus which offers extensive checkout customization, Shopify Basic, Shopify, and Advanced plans have limitations on modifying the checkout logic directly. This means the standard HubBox app for these plans cannot easily prevent the HubBox pickup shipping rate(s) from showing even if the cart contains items unsuitable for pickup (e.g., items that are too large, too heavy, perishable, or restricted).
Using Third-Party Shipping Rules Apps
To address this, you can implement product eligibility rules by using a third-party Shipping Rules app from the Shopify App Store in combination with Shopify's native Product Tags and Collections.
General Strategy
- Identify & Tag Products: Determine which products are ineligible for pickup based on size, weight, content, etc. Apply a specific Product Tag (e.g.,
Pickup-Restricted) to these items in your Shopify product admin. - Create a Collection (Recommended): Create a Shopify Smart Collection that automatically includes all products with your chosen restriction tag. This makes rule management easier. You can hide this collection from your storefront sales channels.
- Install a Shipping Rules App: Choose and install an app from the Shopify App Store designed to modify shipping rate availability based on cart contents (tags, collections, weight, etc.). Examples include Shipfy, Advanced Shipping Rules, Bespoke Shipping, Orderify etc. (Research required to find suitable app based on features/price).
- Note Your HubBox Rate Name: Go to your HubBox App configuration or Shopify Shipping settings and note the exact name(s) you gave your HubBox pickup shipping rate(s) (e.g., "DPD Pickup Point", "DHL Parcel Pickup Express", "UPS Access Point Standard").
- Configure Rule in App: Within the third-party app, create a rule that does the following: if the shopping cart contains any product from your restricted collection (or with the restricted tag) then hide the HubBox pickup shipping rate(s) you noted earlier. Advanced rules might also check total cart weight.
Disclaimer: HubBox is not affiliated with, nor does it endorse or provide support for, specific third-party shipping rules apps. Functionality, pricing, and setup steps are determined by the app developer. Using third-party apps may incur additional subscription costs. Please ensure any app you choose meets your specific needs and test its compatibility thoroughly.
Example Implementation using "Shipfy - Shipping Rates & Rule"
Shipfy is one example of an app available on the Shopify App Store that can achieve this filtering. The following steps illustrate how you might configure it (refer to Shipfy's own documentation for the most current instructions):
Prerequisite: Ensure HubBox is installed and you have created your HubBox pickup shipping rate(s) in the HubBox app admin or Shopify settings. Note the name(s) used (e.g., "Parcelshop Pickup").
Step 1: Tag Products & Create Collection in Shopify
- Tag Products: In your Shopify Admin (Products), identify all products ineligible for pickup. Add a consistent tag to each one, for example:
Pickup-Restricted. - Create Smart Collection:
- Go to Products > Collections > Create collection.
- Title: Give it a clear name, e.g.,
Restricted from Pickup Service. - Collection type: Select
Automated. - Conditions: Set "Products must match all conditions" (or any if preferred), then select
Product tag|is equal to|Pickup-Restricted. - Publishing: Under "Sales channels and apps", click Manage and uncheck all channels to prevent this internal collection from appearing on your storefront.
- Click Save.
Step 2: Configure Shipfy Rule (Simple - Tag-Based)
This option hides the pickup rate if any restricted item is in the cart. It's available on lower Shipfy tiers but doesn't account for total weight/size of multiple eligible items.
- Create Rule: In the Shipfy app admin, create a new delivery customization. Choose the rule type designed for hiding rates based on conditions (e.g., "Hide/Delete - Rule Set 4" in Shipfy's interface at the time of writing).
- Rule Title: Give it a descriptive title (e.g., "Hide HubBox Rate for Restricted Products").
- Set Condition: In the "Customisation Rules" section:
- Select conditions based on "All Below" (AND logic).
- Choose
Choose Collection|Contains|[Select your 'Restricted from Pickup Service' collection]. (Shipfy will use the collection ID once selected).
- Set Action: In the section defining what to hide ("When the above conditions become true..."):
- Choose
Delivery methods name match:|Contains. - Enter a key part of your HubBox shipping rate name (e.g.,
DHL Parcel Pickup Express,UPS Access Point Standard,DPD Pickup Next Day). - Why "Contains"? The exact rate name shown at checkout might dynamically include details like distance or service level (e.g., "DPD Pickup Point (2 miles)"). Using "Contains" ensures the rule matches regardless of these dynamic parts.
- Choose
- Save & Activate: Leave the "Else" section blank. Click "Update" or "Save". Ensure the rule is marked as Active.
Step 3: Configure Shipfy Rule (Advanced - Tag OR Weight)
This option hides the pickup rate if any restricted item is present OR if the total cart weight exceeds a limit. This requires a Shipfy tier supporting advanced/multiple rules.
- Create Rule: In Shipfy, create a new delivery customization using the rule type that allows hiding based on multiple OR conditions (e.g., "Hide/Delete Rule Set 1 (Multiple)").
- Rule Title: Give it a title (e.g., "Hide HubBox Rate - Restricted OR Overweight").
- Set Action First: In the "Enter Delivery Method" section:
- Choose
Delivery methods name match:|Contains. - Enter a key part of your HubBox shipping rate name (e.g.,
Pickup,Access Point). - Select the action as Hide.
- Choose
- Set Conditions (OR Logic): In the "Customisation Rules" section:
- Choose the option for "Any Below" (OR logic).
- Condition 1 (Tag):
Choose Collection|Contains|[Select your 'Restricted from Pickup Service' collection]. - Click "Add Condition".
- Condition 2 (Weight): In the new condition box (linked by OR), choose
Total Weight|Greater than or equals|[Enter max weight in KG, e.g., 15]. Use the maximum weight allowed by your chosen pickup service(s).
- Save & Activate: Scroll down and click "Update" or "Save". Ensure the rule is Active.
Step 4: Testing the Rules
- Add only eligible items below the weight limit to the cart -> Go to checkout -> Verify the HubBox pickup rate IS displayed.
- Add a product tagged as
Pickup-Restrictedto the cart -> Go to checkout -> Verify the HubBox pickup rate IS NOT displayed. - (For Advanced Rule) Add multiple eligible items whose combined weight exceeds your limit -> Go to checkout -> Verify the HubBox pickup rate IS NOT displayed.
- Test with various product combinations.
By using a third-party app like Shipfy, you can effectively work around Shopify's limitations on lower-tier plans and ensure your HubBox pickup rates are only shown for eligible orders. Remember to consult the specific app's documentation and support for detailed setup instructions.
Testing the Integration
After installation and configuration, thoroughly test the setup before launching to customers.
- Use Test Orders: Place test orders using addresses within the Shipping Zones where you enabled HubBox pickup rates.
- Verify Rate Appearance: At the shipping methods step of the checkout, confirm that your configured HubBox pickup rates (e.g., "DPD Pickup Point", "DHL Parcel Pickup Express", "UPS Access Point Standard") appear correctly alongside your standard home delivery rates for eligible addresses. Check naming and pricing.
- Test Selection: Select one of the HubBox pickup rates.
- Complete Checkout: Proceed through the checkout process. Does it complete successfully?
- Check Order Data (Shopify Admin): After placing a test order with a HubBox rate:
- Go to the Orders section in your Shopify Admin and find the test order.
- Tags: Check if the correct tag has been automatically applied (e.g.,
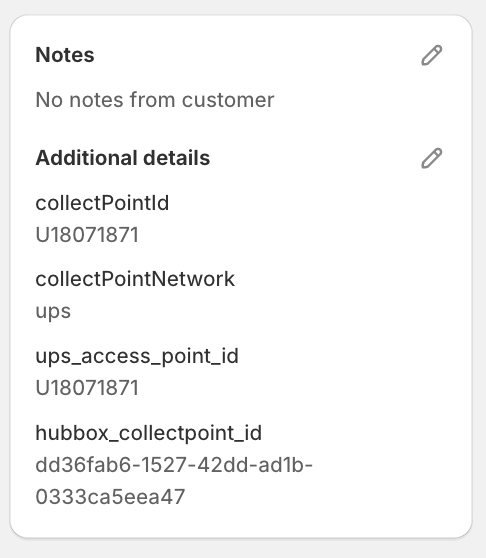
UPS Access Point,DPD Ship to Shop). - Note Attributes / Additional Details: Look in the "Notes" or "Additional Details" section on the order page. Verify that a note attribute (e.g.,
collectPointId,HubBoxLocationID) has been added containing the unique ID of the chosen pickup location. - Shipping Address: Confirm that the primary shipping address listed on the order is still the customer's address, not the pickup point address. The pickup location details are primarily conveyed via the tag and note attribute for fulfillment purposes.
- Cross-Browser/Device: Repeat key tests on different browsers and mobile devices.
To access HubBox's UAT guide, visit the Testing Documentation.
How Pickup Orders Appear in Shopify
When a customer successfully checks out using a HubBox pickup shipping rate, the HubBox app automatically modifies the order in your Shopify admin:
- Tags: A specific tag identifying the service is added (e.g.,
UPS Access Point,DPD Ship to Shop). This allows you to easily filter and identify pickup orders. - Note Attributes (Additional Details): The unique location ID for the selected pickup location is added as a note attribute (often named
collectPointIdor similar). This ID is crucial for your fulfillment team or systems to know exactly which pickup point the parcel needs to be sent to or manifested correctly for.
Use these tags and note attributes in your order fulfillment workflow (e.g., with your WMS, shipping software, or manual processes) to correctly process HubBox pickup orders.

Support
If you encounter issues during app installation, configuration, or testing, please contact the HubBox Client Support or Integrations team at clientsupport@hub-box.com. Provide details about your Shopify plan, the steps you've taken, and any error messages or unexpected behaviour observed.